Tuesday, 26 July 2016

Scrapbook Club Sneak Peek: School Days

Hi bloggers, today Sarah is sharing with us a Sneak Peek of her upcoming Scrapbook Club: School Days. School's out for the summer which is a perfect time to collate photos from the school year to scrapbook. Or maybe delve into the old photo boxes and dig out your old school photos. This layout design also works well with Graduation photos also.

Layout 1

Layout 2

Photo Instructions:
Layout 1 - For this layout you will need either 1 or 2 photos approx. 3" x 4".The photos can be either portrait or landscape on this layout. Please note the photos may need to be trimmed slightly to fit the frames.

Layout 2: For this layout you will need 3 photos that can be cut down in class to suit the look and design you want on your page. The photos should be no larger than 6" x 4" and need to be a mixture of portrait and landscape.

For those of you attending the class on Saturday, Sarah looks forward to seeing you all soon!

Monday, 25 July 2016

Create & Take: Flowering Bike


Hi bloggers, we have another fantastic Create & Take card to share with you today which is once again perfect for these summer months. This time Caz has used the Marianne Box Card die set alongside the new Woodware Flowering Bike stamp set.

So let's get started......

Products Used:


Instructions:

1. Die cut Marianne Frame from the Maja paper and cut off 2.5cm off each side of the frame to make it less deep. Stamp chosen wording along the top of the frame.

2. Cut cream card to measure 20cm x 11.5cm and score approx 2.5cm from each end.

3. Stamp bike image onto centre of cream card and colour with pencils. Stamp heart, colour and cut out. Add Wink of Stella to add shimmer.

4. Die cut 2 x grass from green card. Die cut the bar from green card and stick the grass to the bar. You may need to trim the bottoms until you are happy with the height.

5. Die cut butterflies from paper and edge with coloured ink. Add pen detail.

6. Assemble card as per sample. Punch daisies and add Nuvo drops to centres.

Monday, 18 July 2016

Create & Take: Kraft Sailboat


Hi bloggers, this week is set to be a glorious week in terms of UK weather and what better way to start off a week like this then with a seaside themed card. This card uses the Sailboat stamp set from Stampendous alongside some great Cottage Cutz nautical dies.

So let's get started....

Products Used:

White Stamping Card

Instructions:

1. Cut a piece of Nautical Blue Light cardstock to measure 17cm x 12cm.

2. Cut a piece of the Flour Sack Stripe paper to measure 16.2cm x 11.2cm.

3. Cut a piece of white stamping card to measure 15.5cm x 10.5cm.

4. Stick down the blue card and paper to the kraft card blank.

5. Onto white stamping card piece, cover with the stencil included with the Sailboat stamp set and ink through using the Summer Sky ink pad. Stick down onto the card.

6. Stamp the Sailboat onto white stamping card, colour in boat and mast using Brushed Corduroy pen and cut out.

7. Stamp the sails of the boat onto Flour Sack Stripe paper, cut out and paper piece over sails.

8. Stamp the wave onto blue card twice. Cut both out and add 3D foam pads to the back of one of the waves.

9. Stick the boat down onto card and place waves making sure boat is above top wave.

10. Die cut one seagull and anchor from silver card and anchor rope from kraft card.

11. Stick down elements onto card over the waves as shown.

12. Die cut a kraft banner, stamp with a sentiment and stick to the card, cutting off any excess.

13. Lastly, use glossy accents over the lines of the waves and leave to dry.

This stamp set is a great choice for the summer, whether your making cards for the summer season or wanting to add some beautiful stamped images to a sea themed scrapbook page.

Tuesday, 5 July 2016

Create & Take: Oriental Patchwork


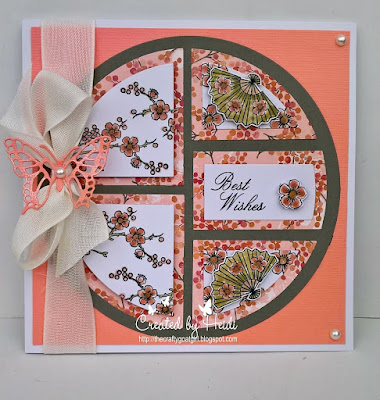
Hi bloggers, it's time for another Create & Take and this week Heidi has designed us an oriental themed card using a Crealies Modern Patchwork die set with the Penny Black Oriental stamp set.

So let's get started....

Products Used:

White Stamping Cardstock
Cream Ribbon

Instructions:

1. Using Bazzill and Bo Bunny papers, die cut your patchwork pieces as follows:
1 x large circle from Rock Candy card.
2 x larger triangles (left of card) using Bo Bunny paper.
2 x smaller triangles and central oblong (right of card) using Bo Bunny paper.
2 x small triangles (on left) using white stamping card
2 x smaller triangles and one smaller oblong (on right) using white stamping card.

2. From your Oriental stamp set, stamp up chosen sentiment and small flower into white oblong (on right).

3. Stamp up floral spray over two larger white triangles (on left) of your card. Colour in using pens.

4. Onto smaller triangles (on right) stamp small flower all over each piece, add colour using pens.

5. Stick elements onto right side of card, using 3D foam pads and stick elements onto left side of card with glue.

6. Onto spare white card, stamp up two fan images and one small flower, colour with pens and cut out.

7. Stick fans and flower onto panels of card using 3D foam pads as shown.

8. Die cut one small butterfly from Coral Cream cardstock.

9. Tie ribbon around card, tying a strong bow.

10. Stick butterfly to centre of ribbon bow, hold down until stuck well.

11. Add a cream pearl to centre of butterfly and two to the right side corners of the card.

12. Lastly, add Nuvo mousse lightly to butterfly, fans and small flower.